Tips Making a Hay Box Cooker from Modern Materials.

China Connection

TB Fanatic
Making a Hay Box Cooker from Modern Materials.

Written by Nevin
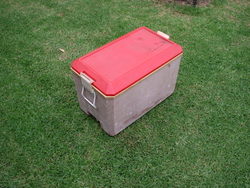

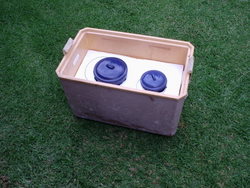
p6230007.jpg


Haybox cooker - looking like a mild mannered esky


I first tried making a genuine hay box cooker many years ago out of straw, a pine box and a large glass casserole dish but it was not really successful. The main problem was that the casserole dish was too large so that you had to make too much food in one go, and there was not enough insulation between the casserole and the side of the wooden box. It was pretty pathetic and I gave up on the idea for a while.

It was Christmas 2002 and while wandering through a neighbour’s garage sale I spied a large plastic esky, it looked well used, but it was intact and BIG (590mm x 370mm x 420mm high), so for the princely sum of $5 it was mine! To turn it into a haybox cooker I then needed to work out what cooking pot/s to use what and insulation material to use.


Cooking Pots
I needed to work out the type of cooking pots to use. I had decided that the size of the esky would allow me to use two pots – a one litre and a two litre pot – so that I would have some flexibility depending on the number of people to be fed. The haybox cooker works most efficiently when the cooking pot is almost full of food.
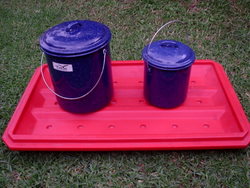

p6230012.jpg


The pots I use

Another way to improve heat retention is to ensure that the cooking pots have the least possible surface area for the volume contained, this is a sphere – which is geometrically inconvenient for my purposes, so I settled on a couple of squat, enamelled steel billy cans. The lids of the cans also have a rim which ensures that condensation on the lid is returned to the pot.

The enamelling on both pots is a dark blue and the idea was that I could use my solar oven to heat up the food and then put it into the haybox cooker to complete the process. That was the theory and for the 1 litre pot it works fine, but I found that when I tried the 2 litre pot it is just a wee to big, and prevents the glass front from entirely closing, which in turn lets the heat out. Another fine theory blown to hell due to lack of attention to detail!


Insulation
The obvious answer here was “hay”, being a traditionalist of sorts, but hay has some disadvantages in that it is not so effective an insulator as some modern materials and it tends to absorb steam and odours during the cooking process which then cause it to grow bugs (yuch!). I wanted something that was light, low maintenance and an effective insulator. As luck would have it, a friend offered me an 1800mm x 900mm sheet of polystyrene foam that was 25mm thick and had been used as packing in a container, so I accepted it gratefully.

I still needed to cut it to shape and the classic way using a saw creates a hell of a mess with fine particles of polystyrene all over the place. So rather than do that I looked around to see if I could get hold of hot wire cutter, which makes a nice smooth cut with little or no little fiddly bits. After some searching I found a reasonably priced ($25) battery powered unit available from Hobbyco in the city (Sydney). Its limitation was that it could only cut polystyrene sheet up to 35mm thick so this was not much of a problem with my stuff being only 25mm thick.
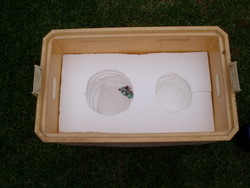

p6230010.jpg


Looking in the box at the styrofoam insulation


I cut two slabs to act as the bottom insulation and then a number of strips with holes in them to accept the cooking containers up to the level of their lids. Here the analogy breaks down! To use the rigid polyester foam over the tops of the cooking containers by carving out the correct size and shape was beyond my technology, so I remembered our family motto - “when all else fails – cheat!”. I bought some polystyrene beads, used for stuffing bean bags and made up a cushion by loosely filling an old flannelette pillowcase, which sits neatly on top of the cooking containers and acts and an insulator. I sewed the pillowcase closed, because anything less than an airtight seal and the beans escape and get EVERYWHERE!
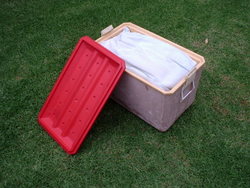

p6230008.jpg


Open haybox showing insulating


One problem with the esky was that, in common with a lot of esky’s nowadays, there is actually no insulation in the formed plastic top, I assume that the air gap in the lid is supposed to act as an insulator. I was not happy with this, so using a cut off funnel I persuaded a whole stack of the polystyrene beans to go into a moulding hole in the top. That was one tedious job, because the beans clearly did not want to go into the lid! Anyway once completed I sealed the hole with an (unused) industrial ear plug.

The haybox cooker was now completed.


Operation
The idea is to load up the cooking pot with your food in the same way you would a crock pot, this style of cooking lends itself to soups, stews and casseroles ie wet cooking so if you are after dry or crisp, this is not the way to go. Having filled your pots with ingredients and water up to about 25mm from the top, put it on the stove and bring it up to the boil, and boil for five minutes to 10 minutes to get the heat into the centre of any larger lumps of ingredient. Once it has been boiling for 5 minutes quickly transfer it to the haybox cooker, smooth down the insulating pillow and clamp on the lid. Leave everything undisturbed for 8 to 12 hours (No peeking!) and then open for a hot deliciously cooked meal. For more detail on how I cook with our hay box cooker go here.

To test our haybox cooker, I filled both containers and boiled them, transferring them straight to the cooker and then sealed it up. Early the next day, about 10 hours later, the 2 litre pot was still over 90°C and the 1 litre one was still above 85°C. The haybox cooker has served us very well, particularly during winter and I even used it to make a batch of my beef and veggie soup, a family favourite. I still looks a bit basic and I want to make a nice wooden box to go around it so that it looks like a piece of furniture rather than a well used esky…………………..eventually!

Update 2013 - Unfortunately I never did get around to making a box for the outside of the cooker to make it a look more reputable, but I did make a whole new one based on a piece of reasonable looking furniture to start with. It gets used regularly and works very, very well!

p6230014.jpg


Copyright © 2019 underthechokotree.com. All Rights Reserved.
Joomla! is Free Software released under the GNU/GPL License.
 

China Connection

TB Fanatic
Haybox how to and description
July 28, 2008 — thermalcooker
Haybox how to and description
Hayboxes

Haybox cooking (also called retained-heat cooking) is an age-old method that can be used to conserve energy not only during times of crisis, but anytime. Depending on the food item and amount cooked, the use of a haybox or insulated cooker saves between 20% and 80% of the energy normally needed to cook a food. The longer an item usually takes on a stovetop, the more fuel is saved. For example, with a haybox, five pots of long-cooking dry beans will use the same amount of fuel to cook to completion as just one pot cooked without a haybox.

The principle of retained-heat cooking is simple. In conventional cooking, any heat applied to the pot after it reaches boiling temperature is merely replacing heat lost to the air by the pot. In haybox cooking, food is brought to a boil, simmered for a few minutes depending on the particle size (5 minutes for rice or other grains, 15 minutes for large dry beans or whole potatoes), then put into the haybox to continue cooking. Since the insulated cooker prevents most of the heat in the food from escaping into the environment, no additional energy is needed to complete the cooking process. The hayboxed food normally cooks within one to two times the normal stovetop cooking time. It can be left in the haybox until ready to serve, and stays hot for hours. “Timing” is much less important than in stovetop cooking: stick a pot of rice, beans, or stew in at lunch time, and it will be ready when you are, and steaming hot, at dinner time.

The haybox itself is any kind of insulated container that can withstand cooking temperatures and fits relatively snugly around the pot. Hayboxes have been made using hay, straw, wool, feathers, cotton, rice hulls, cardboard, aluminum foil, newspaper, fiberglass, fur, rigid foam, and/or other suitable materials as insulation. The insulation is placed between the rigid walls of a box, within a double bag of material, or lining a hole in the ground. “Instant hayboxes” have been created by wrapping a sleeping bag, blankets, and/or pillows around a pot. The most effective insulating materials create many separate pockets of air, which slow down the movement of heat. 2 to 4 inches of thickness (depending on the material) are necessary for good insulation. Some materials, such as aluminum foil or mylar, actually reflect heat back toward the pot. Important characteristics of any insulating material incorporated into a haybox include:

It must withstand cooking temperatures (up to 212 degrees F or 100 degrees C) without melting.
It does not release toxic fumes (any kind of foam insulation needs to be covered with aluminum foil or mylar) or dangerous fibers (fiberglass also needs to be covered).
It can be fashioned to be as snug-fitting as possible around the pot. A little pot in a big box will not cook as effectively; it’s better to wrap pillows, towels, or blankets around it to fill up the space.
It can be made to form a relatively tight seal, so that heat does not escape from the cooking cavity. Since hot air rises, a container designed to open at the base rather than the top will retain more heat.
It is dry, and can be kept dry, since wet materials don’t insulate as well. An inner layer of aluminum foil or mylar helps keep cooking moisture from entering the walls of the box. Mylar, which can be salvaged from used food storage containers, balloons, etc., tends to be a more durable inner layer than aluminum foil.
Cooking containers, too, should have tight-fitting lids, to prevent the escape of heat and moisture.

Since water is not lost in haybox cooking the way it is during extended stovetop simmering, the amount of water used to cook grains and beans is normally reduced by one-quarter. Instead of adding 2 cups of water per cup of dry rice, try adding 1 1/2. Also, the larger the amount cooked, the more effective haybox cooking is, since a full pot has more mass and therefore more heat storage capacity than a half-full pot. Haybox cooking is ideally suited for a family or large group, or anytime there’s a reason to cook in quantity. If you’re cooking alone, try cooking full pots of food using a haybox, then reheating small portions for individual meals–this too can conserve fuel.

Retained-heat cooking has many other advantages in addition to energy and water conservation. As mentioned, it makes “timing” less critical, since it keeps meals hot until serving time. Once the initial boil-and-short-simmer stage is past, it also eliminates the danger of burning the food on the bottom of the pot (the sad fate of too many pots of grains, beans, or other foods left simmering too long without stirring on the stove). Hayboxed food can actually be better for you, and tastier, than food prepared exclusively on a stovetop, because most of the cooking takes place in the 180 degrees F to 212 degrees F range, rather than at a constant 212 degrees F (lower temperatures preserve more flavor and nutrients, as they also do in crockpot cooking and solar cooking).

If you want to prepare multiple items for a meal but have only a limited number of flame sources, hayboxes can also greatly facilitate the logistics of food preparation. For example, you can bring your beans to a boil, simmer them 15 minutes, put them in a haybox; then bring your rice to a boil, simmer it 5 minutes, put it in another haybox; then prepare your vegetable stir-fry or soup, etc. At the end, you’ll have a uniformly hot, unburnt, multi-dish meal, all off a single flame, probably consuming less total fuel than you would have used simply to cook the longest-cooking item alone without a haybox. You’ll also have used one-quarter less of your drinkable water supply in preparing the food.

Presoaking and draining beans always makes them easier to cook, as well as to digest. A few particularly long-cooking foods, such as garbanzo beans, may need reboiling part-way through the cooking process. For health reasons, meat dishes should always be reboiled before serving.

Hayboxes are second only to solar cookers (which, however, are dependent on sunshine) in their potential to conserve resources. They’re easy to build, easy to use, and have many other advantages. Y2K or no Y2K, they deserve a place in every home.

http://www.lostvalley.org/haybox1.html
 

China Connection

TB Fanatic
How Does Aluminum Foil Keep The Food Warm? And Is It Safe?But have you ever wondered how it keeps the food warm and is it even safe to store food in aluminum foils for longer periods of time? Aaisha Aslam | Updated: November 24, 2017 17:55 ISTTweeterfacebook Reddit
How Does Aluminum Foil Keep The Food Warm? And Is It Safe?
Highlights
An aluminum foil keeps the food warmIt doesn't harm to try other alternatives too as suggested by expertsParchment or butter paper can also be used to wrap foods
Whether it is lunch for office or college, planning a picnic or travelling, most of us pack our home-made food in aluminum foil and carry it. But have you ever wondered how it keeps the food warm and is it even safe to store food in aluminum foils for longer periods of time? Aluminum foil is made up of aluminum (as the name suggests), which has reflective properties and acts as a barrier to light and oxygen. As a result, the foil reflects the thermal energy back to the food maintaining the inherent aroma, moisture and flavour of the food. It is often used for packaging of perishable foods and dairy products also for longer storage. Aluminum foil’s usage doesn’t only limit to food, it can also be used to put on windows to keep the house cool during summer and hot during winters.

How Do Aluminum Foils Work?

An aluminum foil keeps the food warm, but placing the foil directly on the object or food doesn’t help much. The reason behind this is, if the foil is in contact with the object, the thermal energy would move in the foil itself and might get away, but if the foil is placed a little away from the food then it can properly reflect back the thermal energy and maintain the freshness of the food. So to avoid contact between foil and food, you can add a few layers of butter paper to make air pockets and then add pack in a final layer of aluminum foil.As aluminum is a poor insulator (substance which doesn’t allow passage of heat) so to make the foil more effective, place it (food wrapped in foil) in fiberglass or ceramic tiffin boxes. It doesn’t only keep the food warmer for long, but also keep things cold.It acts as barrier to the oxygen and air which can transfer heat to the cold or frozen food. Bottom line is it helps by maintaining the temperature of the food, be it warm or cold.

(Also read: Why Cooking in Aluminium Foil Can Be Toxic)
aluminum foil
An aluminum foil keeps the food warm.

Dangers of aluminum foil

Aluminum foil should ideally be used only to keep food warm for shorter periods of time but many people store the food for longer which may have consequences. Any food, if reaches 7- 8 degree Celsius or the time limit of 3-4 hours has exceeded (this may vary depending on the season and outdoor temperatures) then it provides an atmosphere for bacteria to reproduce, so it shouldn’t be outside the refrigerator. The bacteria (lysteria, staph) developed on the food will not be visible but it may cause food poisoning, clammy skin and vomiting.

According to Shalini Manglani, Bangalore based Wellness and Weight Management Expert, “Muslin cloth, food grade brown paper and food grade parchment or butter paper can also be used to wrap foods. Aluminum foil locks moisture and odor in and keeps the food fresh but hot and acidic foods should not be put in aluminum foil as the aluminum will leach into the item.”

parchment paper
Parchment or butter paper can also be used to wrap foods.

1
COMMENTSAlthough aluminum foil is there to keep your food warm, it doesn’t harm to try other alternatives too as suggested by experts. For most working people, eating packed homemade food is a norm. All you need to do is give a little attention to how this food is packed and carried. Be Safe!


https://food.ndtv.com/facts/how-does-aluminum-foil-keep-the-food-warm-and-is-it-safe-1779130
 

China Connection

TB Fanatic
FQKEPYVIE6XM87G.LARGE.jpg


About: Hi, My name is Iris and I am from the Netherlands. I'm a Master Student in Mechanical Engineering and Systems & Control and am interested in sustainable technology but also in my hobbies among which are Jiu ... More About Teyla »
This solar oven is made out of materials that are very easily available and not very expensive either. Most materials used to build this one were scrap materials. We use it in Hungary during summertime when the days are sunny and dry. Temperatures are usually 30-35 degrees Celsius, but for some food it will also work with lower temperatures. As long as it is sunny outside!

This is not the first solar oven we built. The first one was made out of cardboard and we have used it for about 4 summers. That one worked just as good as this one, only this one is somewhat more durable and even easier to use. I do not have any pictures of the construction of the oven, but I don't think that really matters. I'll explain how I built it and what materials I used but I think there's many ways to do this and I'll tell you what I think is important to make this thing work.

On a hot sunny day temperatures in this oven may reach 120 degrees Celcius. We have used the oven to cook many things, such as pasta, rice, pasta sauce, soup, sausages, chicken, vegetables, mince, muffins and more. It is convenient because it doesn't take much of an effort to cook your food this way. More important, of course, is that it is super cool to cook your food using only direct solar energy!

Please note, some pictures in this Instructable are those of the cardboard version. I don't have many pictures of the improved version yet and the cardboard version shows the principles just as well as the new one.


Step 1: A Well-insulating Box


FBLYDWPIE6HDTJU.LARGE.jpg


One of the most important parts required to build this oven (if not the most important) is a box with great heat insulation. It doesn't need a lid (top). For this one we happened to have a styrofoam box that was originally used to transport Dry Ice, so that was very convenient. You can of course use another styrofoam box if you can find one, but if you cannot you can just get some styrofoam or other material from your local DIY to built a box from. What I think is important is that the box is not too high, because than it will be difficult to reflect the solar rays into the box, as your pots or pans will be at the bottom of it.


Step 2: An Outside Box


F3Q1GSZIE6XM8BN.LARGE.jpg


A styrofoam box will not be very firm, hence it is wise to built a box around it. For this one I used OSB plates that were left from the building of a shack (no idea what those plates are called in English. Anyway, just some kind of cheap 'wood', this stuff is actually quite water resistant) to built a nice firm box around it. I even gave it some handles on the side that came off an old kitchen cupboard to make it easier to move the whole thing. This one is always on grass but if it's not you could also consider adding wheels.


Step 3: A Glass Plate to Close the Insulating Box


F3576I7IE6XM87N.LARGE.jpg


To close the insulating box you'll need something that will let the light through. So I guess any kind of transparent plate will do the job. In this case I happened to have a poster frame that fit my styrofoam box really well. It doesn't need to be attached or anything, just lay it on top.


Step 4: Flaps


FG3ILM0IE6XM888.LARGE.jpg


To make sure the solar rays are reflected into the box, you need flaps. The back flap is the most important one. The side flaps don't do so much but I think they're good for preventing convective heat flows that would carry heat away from your solar oven. The size of the back flap is not very important. In my case it is such that it exactly fits on top of the box when closed. This is large enough. The side flaps both go halfway when closing them, as can be seen in the images in the step of the outside box.

You'll also need something to function as a hinge. I took a rubber tube and cut it open, then nailed it to the box and the flaps as can be seen in the picture. This works quite well but there are many ways to do this of course. Furthermore you'll need something to keep the flaps at the right angle. I happened to have some of those things you use to keep your windows open available which I mounted to the box and the back flap as can also be seen in the pictures. This works really great and I liked it because it didn't require me to buy anything other to suit the purpose. The side flaps just lean to the sides of the back flap.


Step 5: Reflective Material


FS73Y8TIE6XM88K.LARGE.jpg


A wooden surface won't really reflect solar rays that well of course, so you'll have to add reflective material to your flaps. I just covered them in aluminum foil, which works great. Make sure you have the shiny side facing towards you. Aluminum foil does tend to rip very easily when touched, which could be reduced by using thicker aluminum foil or something else entirely. I have some silver-colored tape that is used under laminate flooring (to tape the isolation material beneath it) which I apply everywhere the aluminum foil gets damaged and I also use it to tape the different sheets of aluminum foil together, because the rolls are usually not broad enough to cover the flaps in one go.

Furthermore I covered the inside of the aluminum box with the insulating reflective stuff that is normally used behind radiators. This is to prevent your styrofoam box from melting, which actually happens due to radiating heat from the black pots and pans you'll be using. This stuff by itself is not enough so I recommend you put some mass in between, which is also good if you don't have material like this. For example a piece of plasterboard covered in aluminum foil will do the trick.

Now make sure you aim the back flap such that the light is reflected such that it falls onto your pot or pan or whatever you're trying to heat.


https://www.instructables.com/id/DIY-Solar-Oven-1/
 

China Connection

TB Fanatic
Step 6: Black Pots and Pans


F4VDRQOIE6HDTLP.LARGE.jpg


To make sure the pot or pan you're cooking in absorbs as much of the heat in the oven as possible, make sure it is black. We also have a large black pan that does great and what we also use is one of those metal things in which you can make 12 muffins.

Just really make sure it is black and put a coaster underneath to prevent the hot pan from sinking into the bottom of your oven....


Step 7: Cooking Your Food


F27S2FVIE6HDTJV.LARGE.jpg


Now it is time to cook your food. Like said earlier, you can cook many things in this thing, just go and experiment with it, it's real fun.

Just to give you some examples, we cook our pasta and rice in this thing. You can do this even later in the day when it is no longer at its warmest. It will just take a little longer, but hey, no need to stay beside it and it won't boil over. We found that brown rice is difficult to cook in this oven because the outside won't soften that well. Your meat will do fine in this thing as will many sauces you try to make. Vegetables also cook well in this thing.

We've also used it to bake muffins. For these sort of things it is important that you start early such that it is in the oven when it is warmest outside, which is usually between 13:00 and 15:00, depending on where you live. The muffins need the high temperature to bake.

Now, all you have to do to cook your food is turn the solar oven a bit about every half an hour so it remains aimed at the sun. Maybe you could even create a system that automatically rotates the oven to go with the sun.... Also don't try to stir or turn your food every now and then, but don't take of the glass too often because you'll lose a lot of heat. Last, give it some time. I doesn't even take very long for your food to cook, but it doesn't go as fast as it does on the stove. The upside is that you don't have to do much about it, just remember to put it out there in time.

Add TipAsk QuestionCommentDownload
Step 8: Some Final Remarks
So now you know what I've used to build this solar oven. It can of course be even more extensive or, much simpler. As I said earlier, my first version was just a cardboard box from which I cut away one of the flaps. I covered the others with aluminum foil. The cardboard box also contained a styrofoam box just like this one and had a poster frame with glass plate on top. The flaps were held upright by sticks. You can see this version of the solar oven in some of the images. Just see what you can make without using too many new materials because it kind of opposes the general thought of durability.


https://www.instructables.com/id/DIY-Solar-Oven-1/
 
Top